Uplink is a windows application designed for both regular and touch-screen users. The main buttons are large so they can be seen in sun glare and pressed with fingers.
Uplink can be used by any type of user who wants to submit data safely and reliably. This type of user may include:
- Data Collection Contractors
- Internal Field Technicians
- Other Partnering Jurisdictions, such as MPOs
Features:
- It connects to a Traffic Server data source (described earlier in this proposal)
- Transmit a batch of raw data files directly into the server
- Warn if a raw file exists
- Log each transmission attempt
- Email the data source owner when a batch of new data has been submitted and is ready for analysis
Uplink is free for field teams to use and can be downloaded using the link below.
Click here to download Uplink
Instructions
Connect to GEOCOUNTS and Traffic Server
To add a connection to Traffic Server:
- From the menus, select . This opens the Connection Configurations window.
- Click the New button. This will open the Traffic Server Connector Configuration window
- Enter:
- Server URL: This is the address of the server if your service is hosted by Transmetric then it will be http://trafficserver.transmetric.com
- Port: The port number of the server. This will normally be 80.
- Application ID: This is the part of the web address that comes after the server url.
- User name: The username you use to sign into Traffic Server
- Password: The password you use to sign into Traffic Server
- Use as default: If you wish to make this the default server then check the box
- Click the Test Connection button. If the test was not successful check your connection details and try again. If you still experience an error contact support. Once the test was successful click the Save button.
- This will close the Traffic Server Connector Configuration window
- Close the Connection Configurations window
You are now ready to begin uploading data.
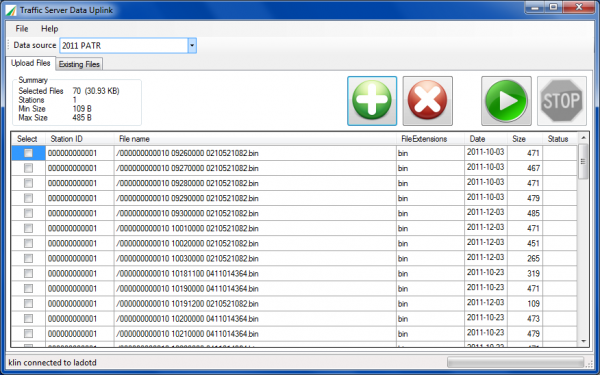
Upload Data
- In the server drop down box select the server where you wish to load the data
- The Datasource drop down will now be populated with the list of datasources on the server. Pick the datasource that corresponds to the data you are uploading.
- Click the large green + button at the far left of the screen. This will open the Windows File chooser.
- Navigate to the directory that contains your traffic data files, select them and click the Open button
- You will now see the list of files in the table below.
- If you data source is set up to use a folder name as the Station ID you can enter the Station ID into the Station ID column.
- If you have to upload many files that require you to enter a station ID, you can create the necessary folder structure on your local computer and create a single zip archive to upload
- After you have selected all your data files, click the large green arrow at the right of the screen to begin the upload
Remove files from the upload list
To remove files you have accidently added to the upload list:
- Check the select box to at the right of the file row. You can select as many as you want.
- Click the large red X to left of the Add button.
- Clicking the remove button with no files selected will clear the entire list.
Inside Traffic Server
Inside Traffic Server, the analyst will see files arriving in the datasource. If the data source and data loader are both on, files will begin loading immediately.